Contents
Converting from Quickbooks to Publishers' Assistant
Submitted by Ron Lawrence February 4, 2011
Many new publishers start out choosing Quickbooks for their accounting software. They generally don't realize the accounting challenges that they are likely to face as their publishing business grows. When a publisher begins to pay royalties, many resort to using Excel to run the calculations and then load the results back into Quickbooks. It doesn't take too many books, however, before the publisher is pulling their hair out and wondering whether there must be a better solution. The problem at this point is that they are so busy trying to keep up with their business that switching to something else can seem like an overwhelming task. Hopefully, this article will help to take some of the stress out of making the switch.
When switching to PubAssist, most new users are concerned with three things:
- their mailing list,
- their title information, and
- their sales history.
Right off the bat, I'm going to try to convince you to forget about your sales history. The reason is that each accounting system has it's own idiosyncrasies. PubAssist is no exception. So, the pain of getting your entire sales history into PubAssist is going to far outweigh any benefit. Instead, I would recommend that you choose a cut-off date. If you have to look up anything prior to that date, simply use your old accounting system. After that date, your data will generally be in PubAssist.
Not quite convinced? Ask yourself, how many times over the last year have you really looked back over your sales history for analysis? Hmmmm? Other than running reports for taxes, have there been any? Even if you were engaged in some analysis, wasn't that a one-time process? Your old accounting software isn't going to disappear. If you need to look back three years from now, your data and software will still be there. What's more, if you are a Quickbooks user, you will quickly discover that there is no export tool for your invoices. You can export your titles (items) and your contacts (customer and vendors), but not your invoices. It's a messy business and Intuit doesn't want to help. So, even if you find a tool to export your sales history directly from your Quickbooks database, you could easily spend days or weeks trying to get your entire sales history converted. Will it have been worth it? I doubt it.
Still not convinced? Well, you can get your sales history into Publishers' Assistant. The most straight forward method will entail getting your sales history into XML format and using Couplet to import; but that is outside the scope of this article.
So, with this realization, we can immediately focus on transferring the list of contacts and titles. There, don't you feel better already? Both of these sets of data are handled by Couplet.
Export your data from Quickbooks
Different versions of Quickbooks may vary, but you should find on the menu the ability to export your customers and your vendors. Here's quick "How To" article on exporting data from Quickbooks:
How to Export Data from Quickbooks to Excel
Older versions of Quickbooks will export records to an IIS file. This file is a tab-delimited text file that can be imported directly into Microsoft Excel. As mentioned above, you'll want to export your customers, vendors, and items.
Use Excel to Prepare Your Data for Import
Looking at your records in Excel will allow you to scan through the list of contacts all at once. You may see some anomalies in your data entry methods. It would be a good idea to take some time to fix some of those anomalies in Excel. You'll find it easier to compare content among several records. If you have a lot of names, this can be overwhelming. Don't fret too much about it; you will always be able to edit your contact records as you refer to them in PubAssist. You don't have to make everything perfect up front. Nonetheless, if you are adept at using Excel, you can straighten out many things with relatively few key strokes. Prettying up your data is actually the least of your concerns. The real challenge is coming up.
Let's start with your customer contacts. The following illustration shows a sample Quickbooks customer export that has been loaded into Excel.
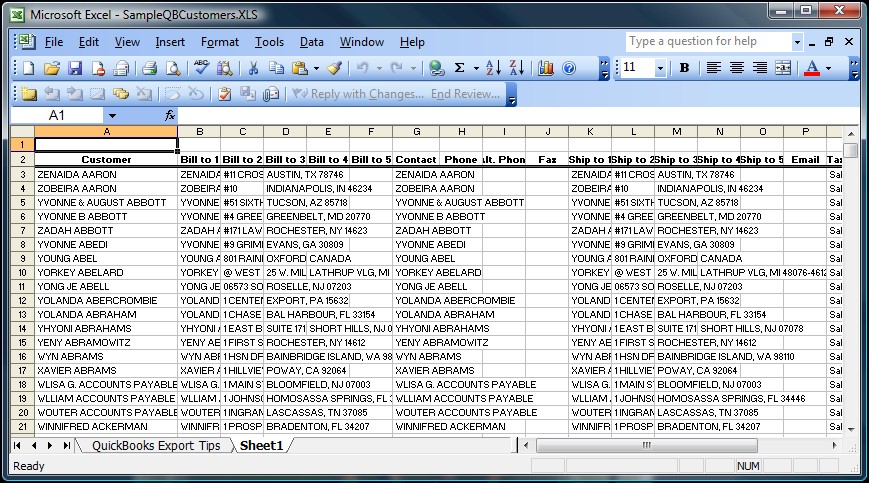
In order for your data to make sense to PubAssist, you must map an import field to the appropriate field in PubAssist. That can be a fairly complicated process. But...we'll take it one step at a time. The concepts that we discuss here may be helpful if you are importing data from sources other than Quickbooks.
The major obstacle is that similar database systems structure their data differently. For example, when you look at your Quickbooks data in Excel, you will see that the address data is collected in general purpose address fields. (e.g. "Bill To 1" through "Bill To 5") Publishers' Assistant keeps address information in discrete fields. (i.e. first_name, last_name, company, po_addr, city, state_abbr, zip_code, and country) Getting data from one form to the other is a challenge to say the least.
When dealing with a Quickbooks Customer export, you'll run into the following issues:
- The billing and shipping addresses are not in discrete fields.
- Billing and Shipping addresses are likely to be duplicates.
-
Quickbooks has three phone number fields, PubAssist has only two.
-
There are other miscellaneous fields in your Quickbooks export that are not directly used by PubAssist.
-
Still other fields, such as "Customer Type" are potentially used in separate tables in PubAssist.
Add a Contact_ID field
PubAssist allows you to enter a unique identifier for each contact. While this field is not essential, it turns out to be very useful when importing data. The reasons why will become more clear later in this article; but for now, take my word for it and add a new column in Excel and label it "CONTACT_ID". (The use of capitals is not important.) You can use anything you like for an identifier, but it must be unique for each contact. If you already have contacts in your PubAssist database, these new contact_id's must also be distinguished from anything you've already used.
The reason for this is that the import routines will use the Contact_ID as a preferred method for identifying an existing contact. By sharing this, I am also pointing out that the import routines will check to see if each imported contact already exists in the database. The intent is to minimize duplicate contacts. Having said this, it must also be said that the import routines are pretty conservative. The routine will err on the side of storing a duplicate contact, rather than running the risk of losing or inappropriately overwriting an existing contact. So, if you have two records that are really for the same address, but there is a slight difference in, say, the name or the street addres, you will wind up with two seperate contacts. Specifying the Contact_ID is one way of telling the import routine that you definitely want to overwrite the existing contact with new data.
For my sample, I simply chose a starting number and assigned a unique number to each contact to be imported. Using a formula to do this is quick and easy. Once you have assigned contact ID's you may want to save your worksheet. Keeping a copy of your original exported data along with these newly assigned contact ID's will allow you to refine your import later on.
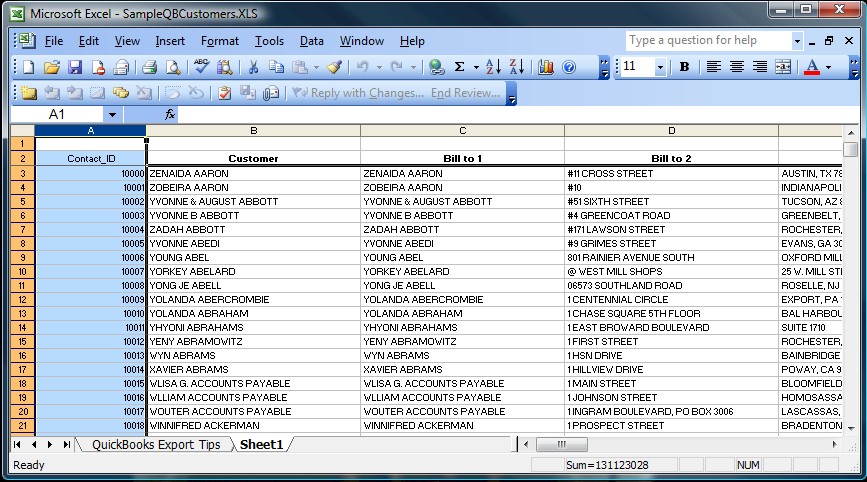
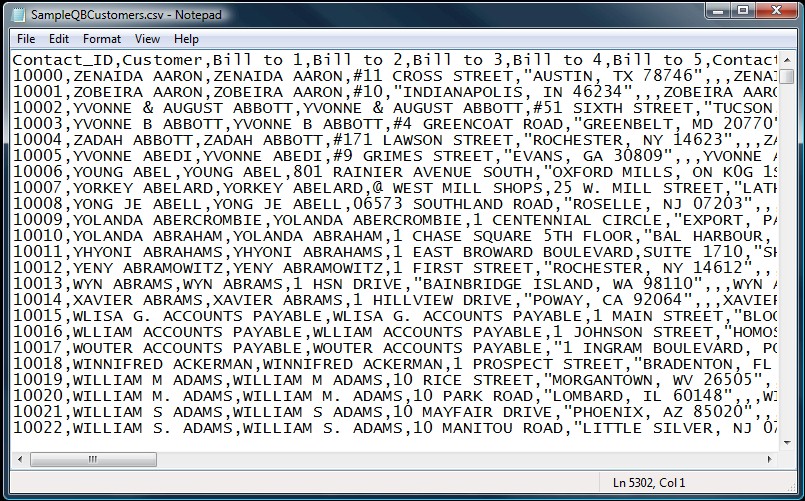
In the interest of not losing any data, you should save the edited spreadsheet to a new file. As long as we are saving, you should know that Couplet will not import directly from Excel. It will import data from a "comma separated values" (.CSV) file format. So, it makes sense to save to that format now. If you open the resulting CSV file with NotePad, you should see something like this:
Eliminate some columns right away
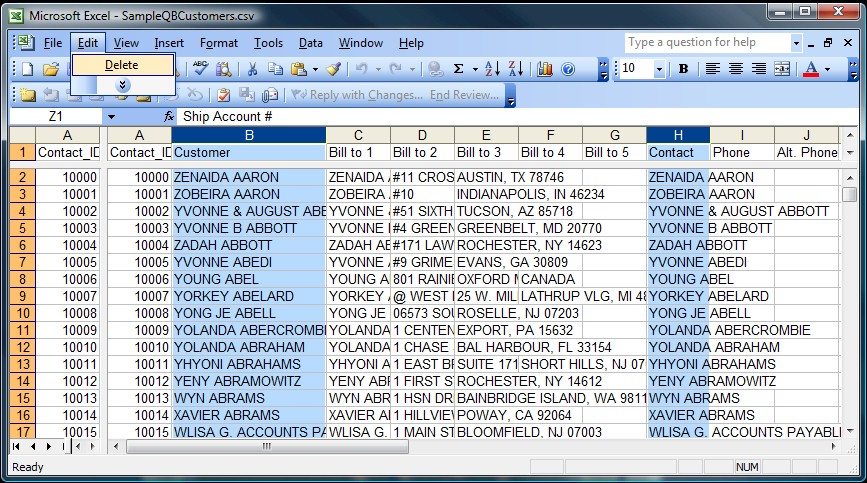
The following is a list of fields that you may be able to eliminate. It will depend, of course, on exactly how you have entered data into Quickbooks. I offer here my justification for eliminating each of these columns. Your situation may vary, so use your judgement. If a piece of data seems unique and important, then hang onto it. Eliminating as many columns as you can will help to remove the clutter when mapping the remaining fields to fields in Publishers' Assistant:
-
Customer - This is generally either the the personal name or the company name. Both of these are generally found in the Bill To fields. If not, you may want to retain this field and rename it when you handle the billing addresses in the steps below.
-
Contact - Frequently, this is the same as the personal name found in the Bill To fields.
-
Tax Item - Publishers' Assistant accounts for sales taxes quite differently from Quickbooks. This column refers to an Item that is used to accumulate your sales tax liabilities. In PubAssist, all customers are assumed to be taxable--unless you specifically mark an invoice as NOT taxable. Should you do so, the tax exempt status is automatically saved to the customer's profile. So, like other fields below, trying to import this field here is more trouble than it is worth.
-
Customer Type - This equates most closely to customer codes in Publishers' Assistant. While you can import customer codes, it is not likely that there will be a direct match from one to the other. If you have actively used the customer type field, you may want to sort your contacts by customer type and break your data into separate files. The Contact Import Wizard will allow you to specify customer codes for the entire import. So, for example, you can import all retailers at once and identify them with a single code. That would negate the need for this column of data in the import. You can also import these Customer Types as customer codes in a completely separate step. If you plan to do so, hang on to the copy of your data with the Contact_Id's assigned.
-
Rep - This equates most closely to the Sales Representatives in Publishers' Assistant. Samples I have seen often use the initials or the name of an employee that handles the customer's account. In other cases, it could very well be a third party that has represented your products to the customer. In Publishers' Assistant, Sales Representatives are contacts, like any other contact. So, there is not likely to be enough information in this field to be useful anyway. Furthermore, a Sales Representative is saved to the customer's profile automatically, when you specify one in an invoice. So trying to import them here is really more trouble than it is worth.
-
Terms - Like the sales representative, the terms you assign to a customer in an invoice will be saved to their profile. So, attempting to import it here is probably more trouble than it is worth.
-
Vendor - I'm not really sure why this vendor field is in the customer export from Quickbooks. In most samples I have seen, the field has been left blank. However, like the Rep field, it is likely to contain a name that should be expanded to a completely separate contact. These names may very well appear in your Quickbooks Vendor export. So, you need not worry about them here.
-
Buyer - Very similar to the Contact field above. If this is the same as the personal name in the address, then it is extraneous. If it really is a unique name, then perhaps it should be saved as a completely separate contact. You can certainly have multiple contacts at the same business address.
-
Ship Method, Ship Account # - The shipment method and account number are generally not associated with a customer contact in Publishers' Assistant. Perhaps they should be. But for now, if this information is important to you, you should move it to the NOTE column, which will be mapped to the Comment field in Publishers' Assistant.
Eliminating these columns will make it easier to compare your billing and shipping addresses in the next steps.
Rename other columns to their Pub``Assist counterparts
Some columns, like PHONE and EMAIL have exactly the same names as their PubAssist counterparts. The following columns have a direct corresponding field in Publishers' Assistant, but should be renamed to match up:
-
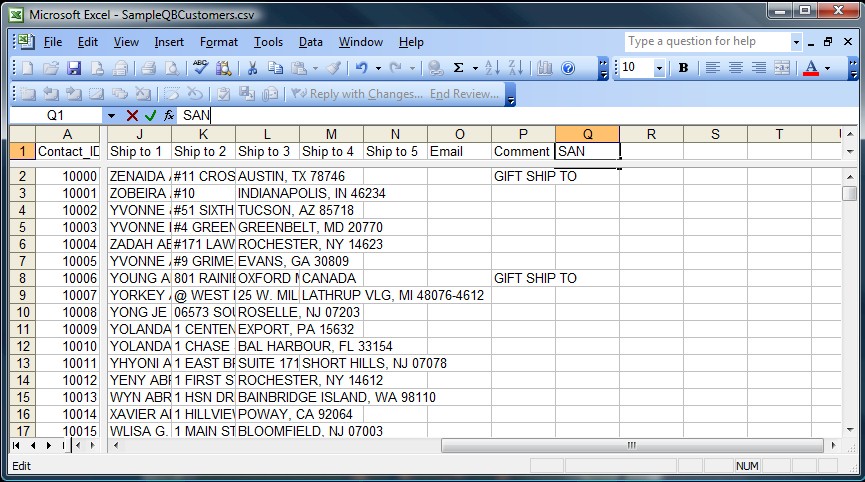
Note should be renamed to "Comment".
-
SAN: should be renamed to "SAN". (Remove the colon.)
Converting the "Bill To" fields
As mentioned above, the billing address is stored in general fields in Quickbooks. One thing you can always do is to create the necessary discrete columns in Excel and move your address data by hand into the proper columns. Ugh! 
...But take heart! because...
-
Couplet contains a heuristic import function that will attempt to do this for you!
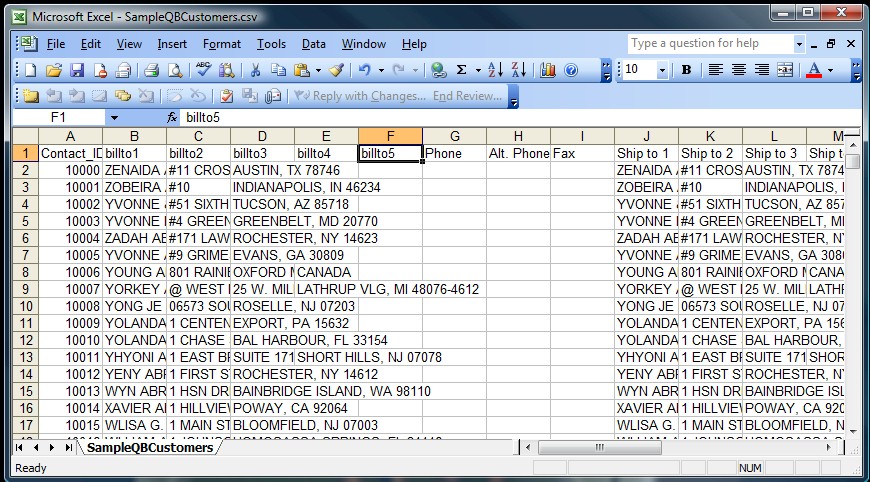
Here's how it works with our sample data from above. Remember, our primary objective is to map our import data fields into PubAssist fields. The Contact Import Wizard will accept generic address fields: BillTo1 through BillTo<n>. It will actually go through the process of trying to identify the personal names, the company name, the street address, city, state, zip code, and country. Is this process perfect? No. But it will work pretty well. As mentioned above, things do not have to be perfect in order to be useful. Later on, when you run into a contact record that doesn't look right, you'll be able to fix it. That, however, will only need to happen on an exception basis. It shouldn't be necessary for the vast majority of your imported records.
So, mapping these fields for the purposes of the import is simply a matter of removing the spaces from the "Bill To" column headings. So, replace "Bill to 1" with "Billto1" and so forth.
One final note on handling these generic address fields:
-
The original address fields will be copied to the comment field in the resulting contact record. So, if you find that the imported data doesn't look quite right, check the comment for the original address.
Converting the "Ship To" fields
The Shipping address fields are quite similar to the billing address fields. In fact, it's not unusual for them to be a duplication of the billing address fields. How you handle the shipping addresses will depend heavily on how you have used those fields in Quickbooks. Before diving in, let me share a little background about how shipping addresses are handled in PubAssist.
-
Quickbooks makes the assumption that every contact has a billing and a shipping address.
-
'PubAssist, by contrast, assumes that the billing and shipping addresses are the same--unless you tell it otherwise.
We took this approach early on as a way to minimize the amount of data that must be entered and stored. When you see how many of your contacts have duplicate billing and shipping addresses, I think you will agree with our approach.
In PubAssist, if a contact has a p.o. box for a street address, a seperate street address can be entered into the courier address field (COUR_ADDR). In such a case, these addresses are for the same physical location; but if a courier service such as UPS or FedEx is used to ship books to them, then the courier address will be presented rather than the postal address.
-
NOTE: If the shipping address is really a completely different location, then you should import it as a separate contact.
With these things in mind, you might be justified in simply removing the shipping address fields altogether--at least for the first pass of importing your customer contacts. Since we've preserved the originally exported data, you could always go back to it to capture the shipping addresses that you want to import separately. If you have saved your data with the Contact_ID field, importing only the shipping address fields for the assigned contact ID will be made easier. The hard part is deleting all of the duplicate shipping addresses.
Should you decide to keep the shipping address fields, the import routine will collect them into the COUR_ADDR field. You won't want to duplicate the billing address, so your next step should be to eliminate any shipping addresses that are the same as the billing addresses. Where duplicates appear, simply select the cells in the ship to columns for multiple rows, and hit the delete key.
In my sample data, this was made easier by sorting my contacts by street address. That has the effect of collecting all of the P.O. Box addresses together. These P.O. Box addresses are the most likely to contain a different street address for shipping. Using this technique, I was able to select a large blocks of shipping addresses that could be eliminated all at once. If the shipping address is the same P.O. box as the billing address, it should be deleted as well.
-
The only shipping addresses you want to keep are entries that have a different street address from the billing address.
It is recommended that you remove the company name and personal contact from the shipping address fields. If a courier address is specified, Publishers' Assistant will assume that the street, city, state, and zip code will appear in the courier address field. These are the attributes you'll want to keep in the Ship To fields.
So, in our sample, "Ship to 1" should be eliminated to remove the company and/or contact names.
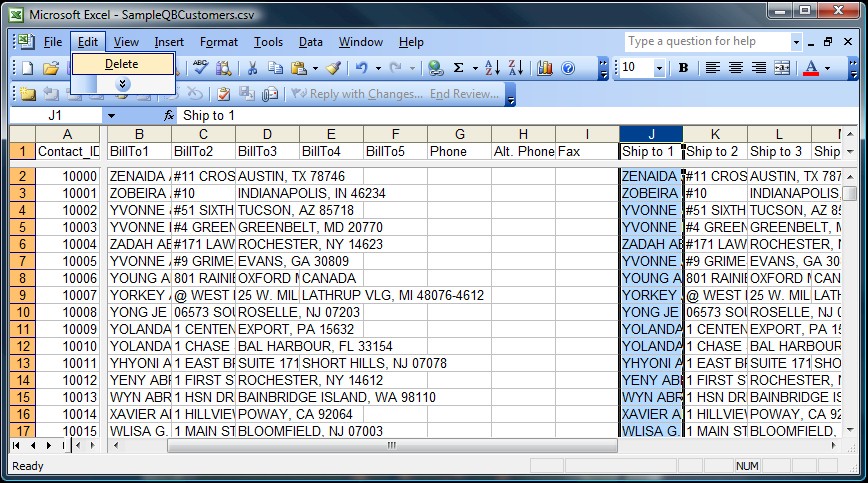
If both were specified, then the "Ship To 2" column may contain data you will want to eliminate as well. That's a bit more cumbersome. You'll have to search down through the column to remove those names where they appear.
You may find that the "Ship To 5" column contains nothing but the country, if it contains anything at all. The country is not needed for the courier address field. Check down through the contents. If you do have other address attributes, see if you can rearrange the address for that contact in order to empty "Ship to 5". Assuming you succeed in doing this, you can delete the column labeled, "Ship to 5".
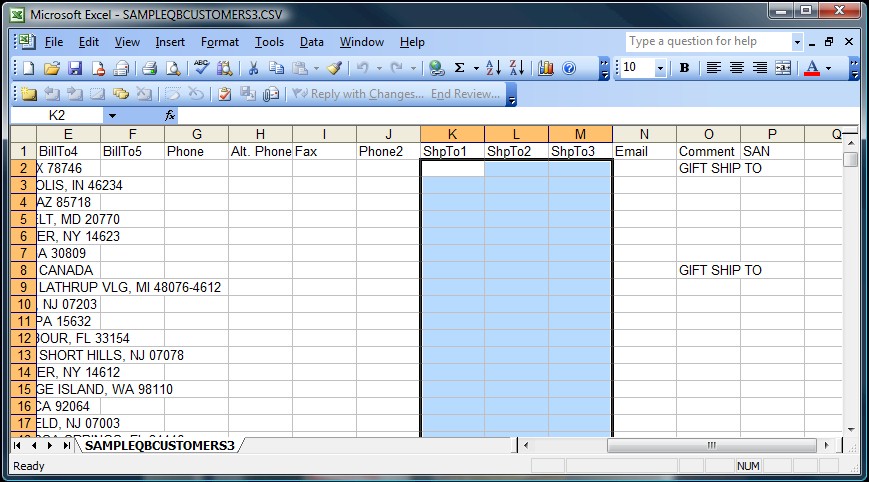
As with the Bill To address fields, the spaces should be removed from the field names. So, rename the columns: "Ship to 2" will be renamed to "ShipTo1", "Ship to 3" should be renamed to "ShipTo2", and so on.
Combining phone number fields
The phone number fields in the Quickbooks export are called: "phone", "Alt. Phone", and "FAX". The corresponding fields in Publishers' Assistant are: "phone" and "phone2". Thus, the PHONE field will import into PubAssist without any changes. It's the alternate phone numbers that we'll be concerned with.
If you look through your Quickbooks data, you are likely to see that many of the ALT. PHONE and FAX fields are empty. Rarely are they both filled in. In PubAssist, the PHONE2 field is generally used to store a FAX number. Enough space is available to allow you to prefix the fax number with "FAX:". Similarly, you could prefix the phone number with "CELL:" or "LOCAL:". These are not necessary, but may be helpful in distinguishing why you might use the alternate phone number. So, here's what I do to pull these phone numbers into a single field:
- First, create a new column and label it, "PHONE2".
- Next, enter the following formula into the first available cell (row 3) in the new column:
=IF(ISBLANK(I3), H3, "FAX: " & I3)
- Now, copy this cell to all of the others in the new column.
If you set your cursor on an entry where there is a Fax number, you'll see something like this:
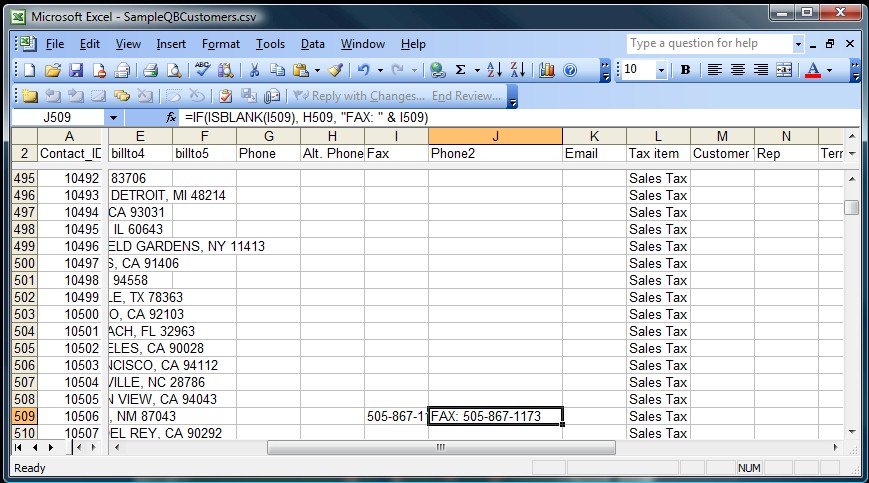
The result will be that if a Fax number exists, it will appear in the Phone2 column prefixed by "FAX:". If no Fax number exists, then the contents of the Alt. Phone columnn will appear in the Phone 2 column. If both are blank, then of course no phone2 entry will appear. If you do have entries with both, you'll want to move one or the other to the Notes column. As you can tell, the Comment column is the catch all.
Note that you can't eliminate the ALT. PHONE and FAX columns just yet. Your formula in the PHONE2 column depends on the contents of these columns. However, if you save your spreadsheet to a CSV and then recall it into Excel, those formulas will be replaced with the resulting values. You could then delete the ALT. PHONE and FAX columns. It turns out that Couplet will ignore any fields that are not in the PubAssist database. So, you really don't need to worry about the ALT. PHONE and FAX columns after all.
Congratulations! You've just prepared your Quickbooks customer data for importing into Publishers' Assistant. The hard work is done!
Summary Field Mapping for Customer Fields
Here's a summary of the procedure outlined above. The following table lists the original fields mapped to the imported fields, and finally to the PubAssist fields that will ultimately hold the data after the import:
|
Original |
Imported |
Comment |
|
PubAssist Field |
|
|
Contact_ID |
Add Contact ID field and assign unique ID's |
|
Contact_ID |
|
Customer |
|
Delete |
|
|
|
|
|
|
{ |
First_Name |
|
Bill to 1 |
BillTo1 |
Remove spaces. Converted upon import. |
Last_Name |
|
|
Bill to 2 |
BillTo2 |
Remove spaces. Converted upon import. |
Company |
|
|
Bill to 3 |
BillTo3 |
Remove spaces. Converted upon import. |
PO_Addr |
|
|
Bill to 4 |
BillTo4 |
Remove spaces. Converted upon import. |
City |
|
|
Bill to 5 |
BillTo5 |
Remove spaces. Converted upon import. |
State_Abbr |
|
|
|
|
|
Zip_Code |
|
|
|
|
|
Country |
|
|
Contact |
|
Delete if already specified in BillTo address. |
|
|
|
Phone |
Phone |
No change |
|
Phone |
|
Alt. Phone |
Alt. Phone |
Not used. |
|
|
|
Fax |
Fax |
Not used. |
|
|
|
|
Phone2 |
Add Phone2. Use formulas to derive from Alt. Phone and FAX. |
|
Phone2 |
|
Ship to 1 |
|
Delete (Same as customer) |
|
|
|
Ship to 2 |
ShipTo1 |
Eliminate duplicates to bill to address. |
} |
|
|
Ship to 3 |
ShipTo2 |
Eliminate duplicates to bill to address. |
Cour_Addr |
|
|
Ship to 4 |
ShipTo3 |
Eliminate duplicates to bill to address. |
|
|
|
Ship to 5 |
|
Checkbefore deleting. This is generally just the Country. |
|
|
|
|
|
No change |
|
|
|
Tax item |
|
Not used. |
|
|
|
Customer Type |
|
Not used. |
|
|
|
Rep |
|
Not used. |
|
|
|
Terms |
|
Not used. |
|
|
|
Note |
Comment |
Just change field name. |
|
Comment |
|
VENDOR |
|
Not used. |
|
|
|
BUYER |
|
Not used. |
|
|
|
SHIP METHOD |
|
Add to Comment (Note) if important. |
|
|
|
Ship Account # |
|
Add to Comment (Note) if important. |
|
|
|
SAN: |
SAN |
Get rid of the colon. |
|
SAN |
Importing Your Data Using Couplet
Back Up Your Data
This is really important!
-
The import process can potentially add a whole bunch of new records to your database all at once. In the case of my sample, I'm adding over 4700 new contacts. If something doesn't work as expected, you'll have a whole lot of garbage in your database. If you don't have a backup, your only recourse is to delete all of those records one at a time.

If you are unsure how to back up your data, check out this article: Back Up Your Data
Run the Contact Import Wizard
Couplet, if you haven't already learned, is a companion product to Publishers' Assistant. You can think of it as an import and export tool for PubAssist. The implications of importing from and exporting to different formats are numerous and powerful; but we'll leave those for other articles. We're focused here on getting your Quickbooks data into PubAssist.
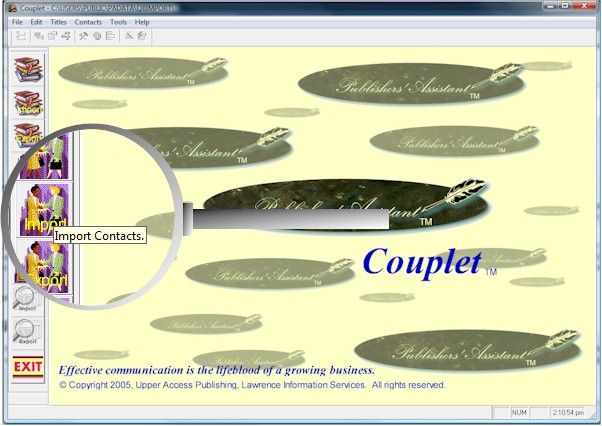
To begin the process, click on the Import Contacts tool on the Couplet toolbar.
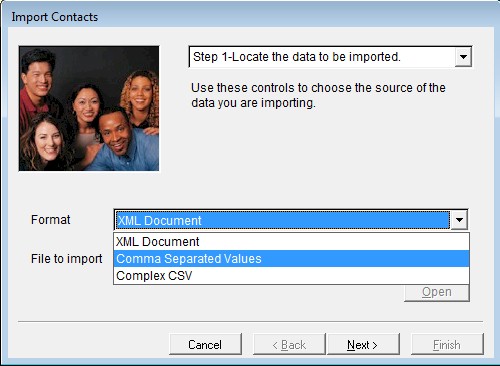
Now you are presented with the Contact Import Wizard. Choose the Comma Separated Values option on the Format option.
Click on the "Locate" button to navigate to the location of your edited Quickbooks export. (It should be a CSV file.) Once you locate it, you can verify that this is the correct file by clicking on the "Open" button.
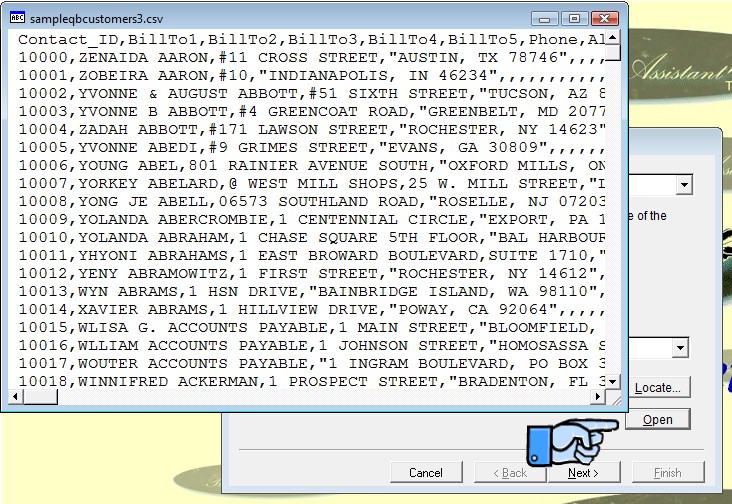
Close the CSV file and click on "Next" to move to Step 2 of the Wizard.
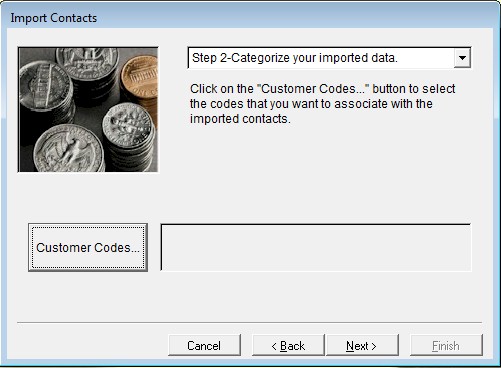
I mentioned above, that you can associate customer codes with the contacts you are importing. This is the step where you can do this. The customer codes must already be loaded in order to select them here. In my example, we're importing to a brand new database. So, no customer codes are available right now. Click on "Next". Step 3 is where all the work takes place.
-
Notice that there are three modes of updating records.
If you are importing a new contact, it won't matter which mode you choose. I mentioned above, however, that there may be cause to revisit your import data and import perhaps just a portion of it again.
- The update mode is set to "Update only empty fields" by default. This prevents the import from overwriting data already in the record. Only if a field is blank will it be filled in with the imported data.
- By contrast, "Overlay with new data" will overwrite an existing contact with the data being imported. If there is an existing value in a field, and the imported data for that field is blank, then the existing data is retained.
- Finally, "Replace all fields" does just what is says. The entire record is overwritten with the imported data--whether the imported fields have values or not.
Click on the "Import" button to begin the process. You should see contact names presented beneath the progress bar.
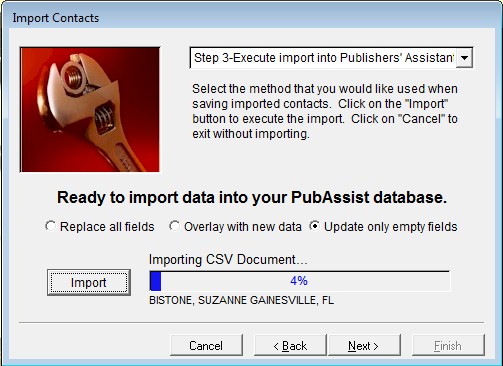
This procedure takes a while. So, you might want to take a break, or plan your import at the end of the day. When completed, click next to finish the wizard.
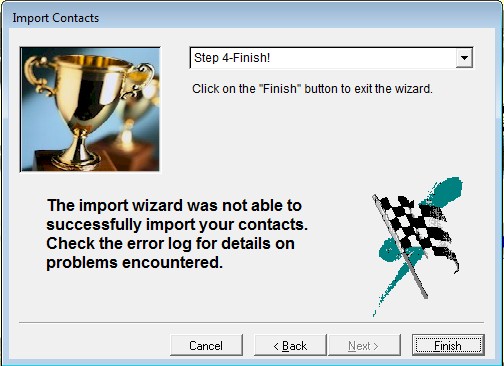
That's it! You can navigate through your newly imported contacts using the Contact screen. If for some reason things haven't turned out as you expected, you can restore your backup, revisit your CSV file, and try the import again.
Now let's work on the Vendors
By now, you should get the idea that you are creating a one-to-one mapping of fields in the import file to the resulting fields in Publishers' Assistant. To convert vendors, you will use the same kind of procedure outlined above. The field mapping is a little different, however.
It turns out that Quickbooks keeps more discrete fields for vendors. Go figure. But, they still combine name fields. They also separate the street address fields. So, depending on how you have collected your vendor data, you will have a choice:
-
You can separate names and combine street addresses manually to map them directly to their PubAssist counterparts. Since you probably have a lot fewer vendors than customers, this may well be feasible and it will always be more reliable.
-
You can use the BillTo fields to allow the import procedure to split your names for you. Even so, the City, State, Zip Code, and Country fields should be mapped to their PubAssist counterparts.
Here's a summary of the field mapping:
|
Original |
Imported |
Comment |
PubAssist Field |
|
|
Contact_ID |
Add unique identifiers. See Account # below. |
Contact_ID |
|
Vendor |
Company |
If not always a company, use BillTo1 |
Company |
|
Street1 |
BillTo3 |
Combine or use BillTo to convert on import. |
PO_Addr |
|
Street2 |
BillTo4 |
Combine or use BillTo to convert on import. |
|
|
|
|
|
|
|
City |
City |
|
City |
|
State |
State_Abbr |
|
State_Abbr |
|
Zip |
Zip_Code |
|
Zip_Code |
|
Country |
Country |
|
Country |
|
Print on Check as |
Not Used |
|
|
|
|
|
|
|
|
Account No. |
|
If used, could be Contact ID |
|
|
Alt. Contact |
|
If used, copy to a separate record. |
|
|
Contact |
First_Name |
Split manually, or use BillTo to convert on import. |
First_Name |
|
|
Last_Name |
Split manually, or use BillTo to convert on import. |
Last_Name |
|
Phone |
Phone |
|
Phone |
|
Alt. Phone |
|
Not used. |
|
|
Fax |
|
Not used. |
|
|
|
Phone2 |
Use formula to derive from Alt. Phone and FAX. |
Phone2 |
|
Vendor Type |
|
Not used. |
|
|
Tax ID |
Fed_Tax_ID |
|
Fed_Tax_ID |
|
Eligible for 1099 |
|
Not used. |
|
|
Note |
Comment |
|
Comment |
Conclusion
Whew! Now you know why there aren't more articles and tutorials on importing. It's not so much that it is hard. It's just tedious. Describing it is tedious. The procedure for importing titles is very similar. Of course, you will use the Title Import Wizard, rather than the Contact Import Wizard.
While this article may seem like a lot to get through, the concepts apply to importing data from pretty much any source. The name of the game is to get your import data fields to line up with the fields in Publishers' Assistant. The Field Map utility in Couplet can be helpful, but it still requires that you have a one-to-one relationship between the imported fields and the fields in PubAssist. More detail on the Field Map utility will have to wait for another article. For now, I hope we've helped you over the hurdle in moving data from Quickbooks to Publishers' Assistant. Good luck!


 Follow conversations with Ron on SPANNet.org.
 Proud participant in Microsoft Visual FoxPro Forum at Tek-Tips