Exporting Invoices to UPS Online WorldShip
Some customers have a need to export invoices from Publishers' Assistant to the UPS WorldShip service. Right now, this process requires some effort to get set up. The setup, however, is a one-time procedure if you always save your PubAssist data to the same export file. This page documents that procedure.
To complete the connection between Publishers' Assistant and UPS Online WorldShip, you will need to execute three major steps:
- Export some data from Publishers' Assistant.
- Describe that exported data to ODBC.
- Map the exported data fields to fields that are within UPS Online Worldship.
Fear not! While the setup may seem a bit overwhelming, once you have it, exporting data to UPS will be a snap!
-
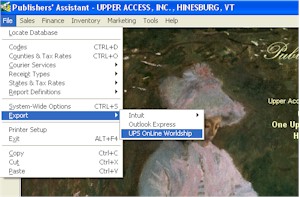
From within Publisher's Assistant, go to the File menu. Select "Export" and then "UPS Online Worldship".
-
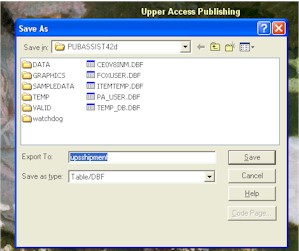
You'll then be asked where you want to save your exported data. You can select the name and location of your export, but you should always save your data to the same file so that UPS Online WorldShip (and ODBC) will know where to find it.
-
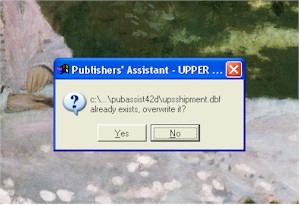
Of course, if saving to an existing file, you will be asked whether to overwrite the existing file.
-
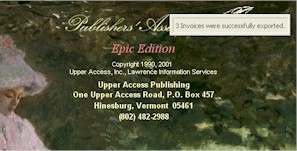
This process is very short, and the message presented is your only indication of success.
This actually completes the process for exporting data from Publishers' Assistant. This is all you will have to do on a regular basis after you've completed the setup.
In order for UPS Online WorldShip to be able to read your data, however, you will need to make it available via ODBC. This isn't as bad as it sounds. ODBC is Microsoft's tool for describing a variety of data sources so that they can be used by many Microsoft tools. For example, you can make text files and Excel file available to Access so it looks like another Access table. In our case, we are making a Visual Foxpro "Free Table" available through ODBC. If you always save your export to the same file, you will only need to describe this file to ODBC one time.
-
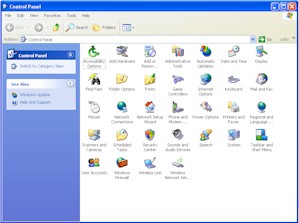
You begin by going to the Windows Control Panel and selecting Administrative Tools.
-
Under Administrative Tools, you can select the "Data Source (ODBC) utility.

-
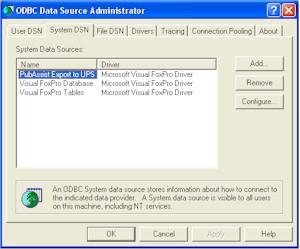
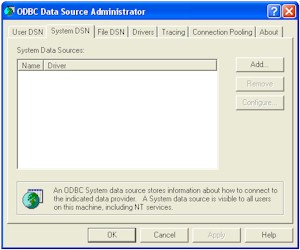
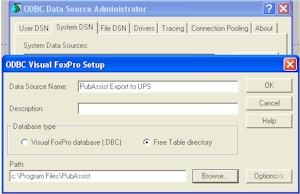
If you want all users and processes that run on this machine to be able to see the export file, you should select the System DSN tab on the Administrator. Click on the "Add..." button to add a new data source.
-
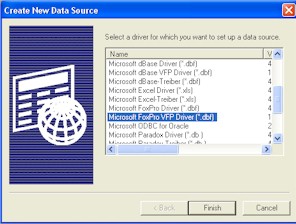
Select the "Microsoft Foxpro VFP Driver" for the new data source.
-
You may find that you don't have the correct driver installed on your system. You can download the driver from the Microsoft website. Download and install the driver if necessary.
-
Back to our ODBC Administrator. Assuming you have the Foxpro driver installed, after selecting the driver, you will be asked to describe the data source. Give it a descriptive name of your choice. Here I've used "PubAssist Export to UPS". It's important to select "Free Table directory" as the Database type. You can then enter or "Browse" to the location where you saved your exported data above. In our example, we saved it to the normal PubAssist folder.
 Important: Enter or select only the path to the folder, not to the table file itself. If you actually select the table file, you will receive an error when UPS Online Worldship attempts to access the data.
Click "OK" to complete this step.
-
You should see the new data source with the name you assigned it on the System DSN page of the ODBC Administrator. Your next steps will be to describe this new data source to UPS Online WorldShip. This process is within your UPS Online WorldShip application. We've made an attempt to name all exported fields according to the names used in UPS Online Worldship, so you should have an easy time matching up PubAssist fields with your UPS fields. Refer to your UPS documentation to complete this mapping process. Keep in mind that this is a one-time process. Once you are set up, as long as you export data to the same location from PubAssist, your UPS application will be able to import it.